前言
Hello, 小伙伴们,我又更新啦!!
大家应该有注意到,社区最近在致力于推动OpenHarmony的生态,许多关于OpenHarmony的文章与线上活动开始应接不暇地出现。当然,这得益于OpenHarmony3.1的诞生,这是个好的开始,OpenHarmony的未来无疑是有迹可循的。
作为一名北向的开发者,笔者很遗憾不能带来与OpenHarmony相关的干货分享,因为笔者并没有南向的硬件设备开发基础。关于OpenHarmony的内容,读者们可以参考社区里的老师们的精彩内容,而笔者将继续分享与HarmonyOS有关的北向知识,希望能帮助到有需要的读者,并为社区的生态繁荣做出力所能及的贡献。
组件焦点

首先,什么是组件焦点呢?
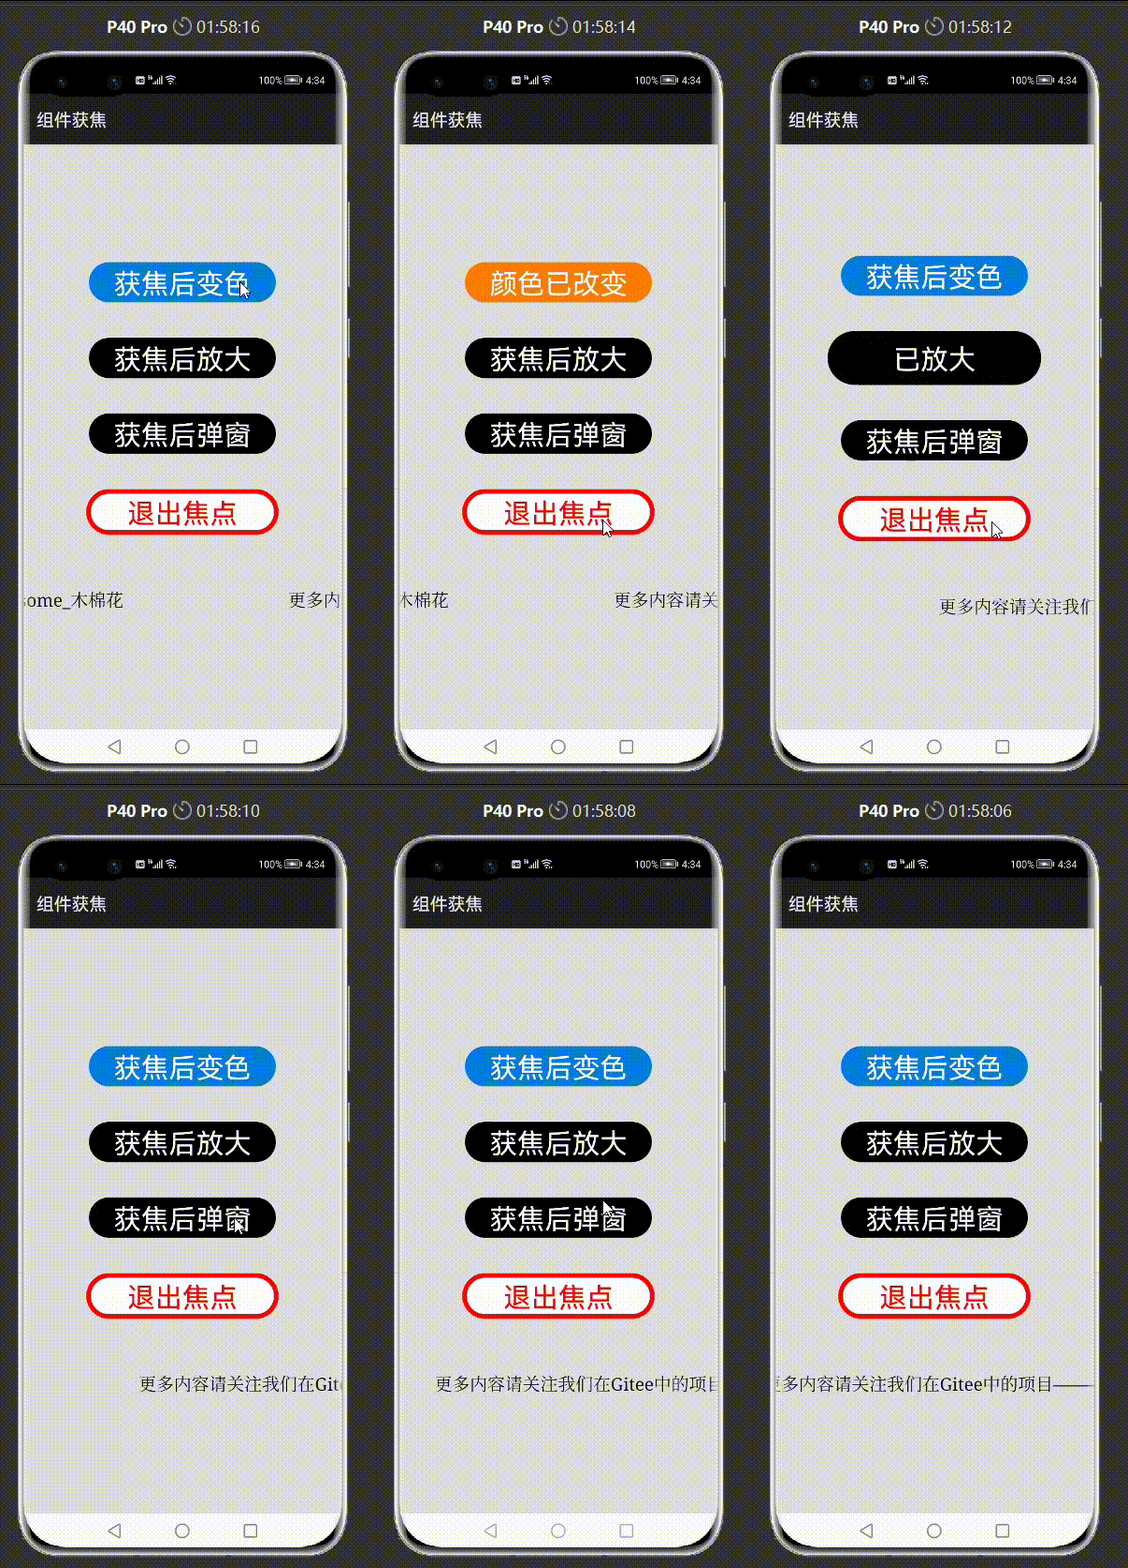
组件焦点是指当前的用户界面中被用户关注的组件位置,也可以理解为组件的一种状态。当某个组件处于焦点状态时,它便成为了用户需要进行交互的对象。在一个单独的UI界面中,至多只有一个组件是处在焦点状态的,换句话说,不可能有两个同级组件同时处在焦点状态。组件焦点的概念不会很复杂,但用文字描述起来可能比较抽象,读者们可以结合上面的gif动图进行理解,而这张动图里的内容也是本期的分享中要实现的功能。
组件焦点在UI设置中有着重要的地位与非常广泛的应用,这在现实生活中是显而易见的。比如,我们要在文本框中输入文字,我们点击文本框时它便处于焦点状态;
当手机的应用跳出一个弹窗时,我们要选择弹窗中提供的选项,这个过程中弹窗便处于焦点状态。
以上就是组件焦点的概念,接下来我将给出与上面的动图同款的Demo的编写过程,而这个Demo也是组件焦点应用的一个典型例子。相信在制作完这个Demo后,你一定会对组件焦点有更深刻的理解。
目录
(1)创建一个新项目。
(2)进行XML布局。
- 利用Graphic为组件设置背景元素。
- 在XML文件中定义Button组件。
(3)设置Button组件的交互逻辑。
- 原理。
- 组件获得焦点后变色。
- 组件获得焦点后变大。
- 组件获得焦点后弹窗。
正文
1、创建项目
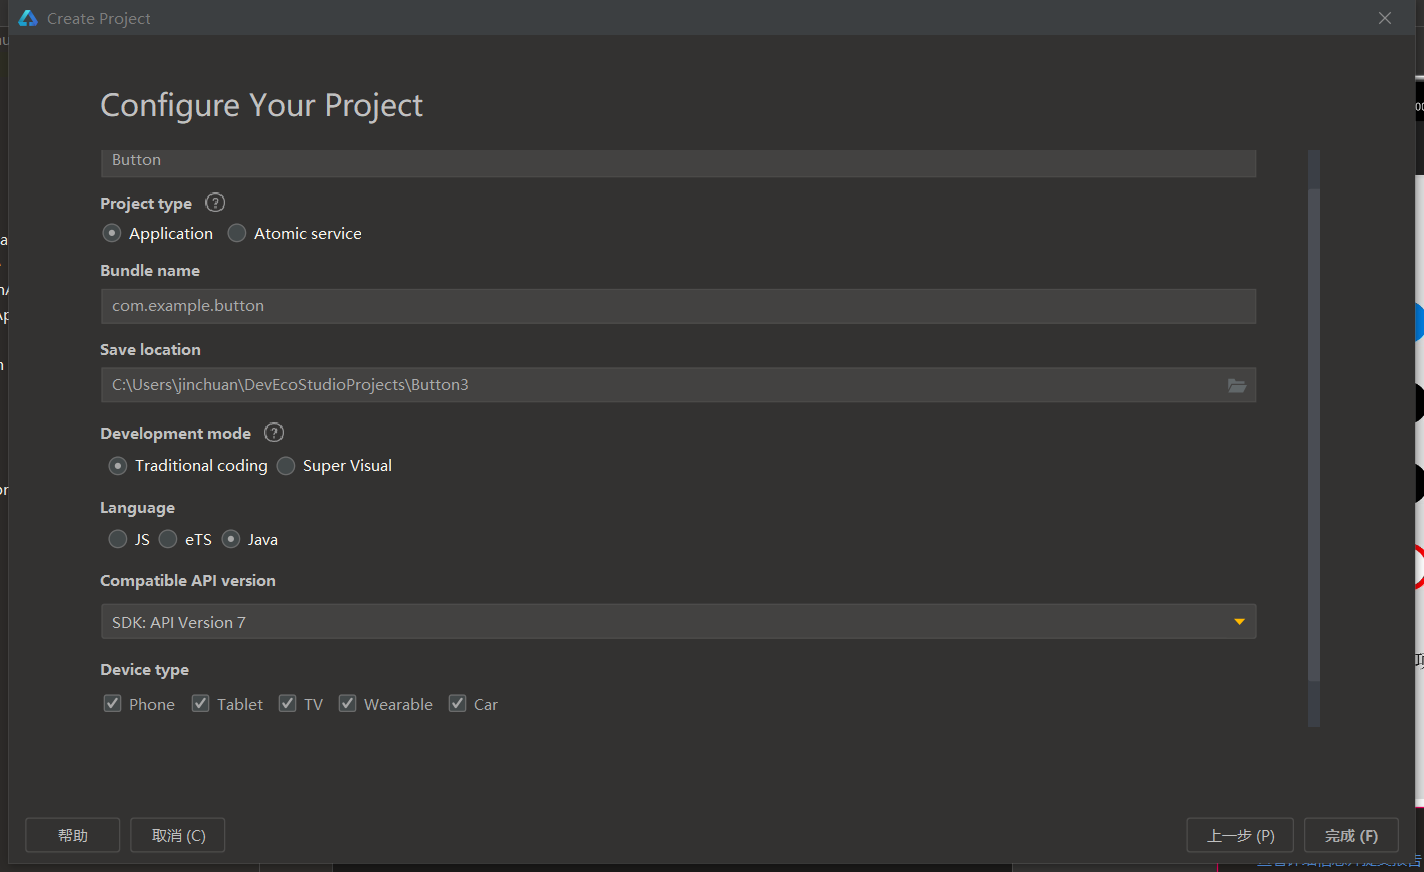
打开HarmonyOS的IDE,创建一个新的Java空白项目,相关勾选如下:

2、进行XML布局
利用Graphic为组件设置背景元素
我们先要制作两个新的ghaphic文件,用于定义不同Button组件的背景元素。
打开entry>src>main>resources>base>graphic。
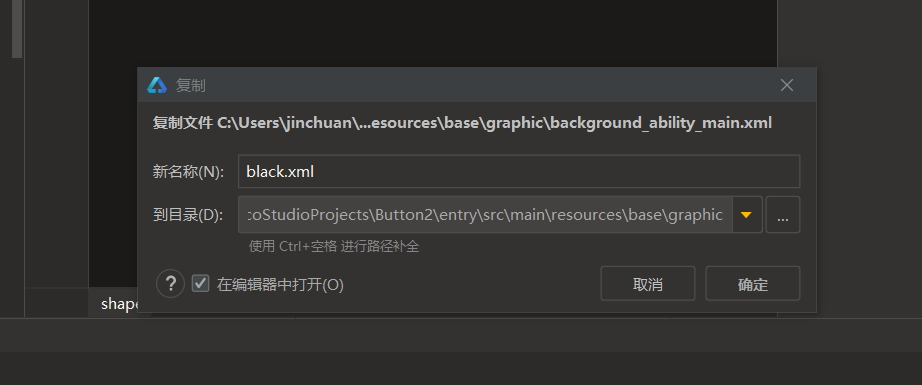
接着,单击background_ability_main并通过Ctrl+C复制。
复制完成后,再次单击ability_main_xml并在键盘上按Ctrl和V,完成文件的粘贴,在粘贴过程中顺便将background_ability_main.xml重命名为black.xml。

这样,我们就得到了一个新的graphic文件。
然后,我们打开这个新的graphic文件,将代码修改为如下:
<?xml version="1.0" encoding="UTF-8" ?>
<shape xmlns:ohos="http://schemas.huawei.com/res/ohos"
       ohos:shape="rectangle"
    >
    <corners
        ohos:radius="50vp"/> //设置圆角
    <solid
        ohos:color="black"/>  //设置颜色
</shape>
这样之后,第一种Button组件的圆角和颜色便被设计好了,适当的圆角能让Button组件变成大家喜欢的形状。
接下来我们要设计Button组件的第二种背景元素,按照前面的操作,再次复制粘贴一份graphic文件,这次将其重命名为exit.xml。

然后,我们打开这个新的graphic文件,将代码修改为如下:
<?xml version="1.0" encoding="UTF-8" ?>
<shape xmlns:ohos="http://schemas.huawei.com/res/ohos"
       ohos:shape="rectangle"
    >
    <corners
        ohos:radius="50vp"/>  //设置圆角
    <stroke
        ohos:color="red"
        ohos:width="5vp"
    />   //设置边框颜色和边框厚度
    <solid
        ohos:color="white"/>
</shape>
复制这样之后,第二种Button组件的圆角和颜色便被设计好了。
当然,利用ghaphic文件设计Button组件的样式元素是为了使其便于辨认和美观,如果你有更好的主意,你也可以自主设计Button组件的样式。
在XML文件中定义Button组件
打开entry>src>main>resources>base>layout>ability_main_xml。
将原有的DirectionLayout(即方向布局)改为DependentLayout(依赖布局),并设置DependentLayout的背景色。
<?xml version="1.0" encoding="utf-8"?>
<DependentLayout
    xmlns:ohos="http://schemas.huawei.com/res/ohos"
    ohos:height="match_parent"
    ohos:width="match_parent"
    ohos:alignment="center"
    ohos:orientation="vertical"
    ohos:background_element="#EDEDED"
    >
   ...
</DependentLayout>
删除系统自带的内容为“Hello World”的Text组件,依次加入四个Button组件。
<?xml version="1.0" encoding="utf-8"?>
<DependentLayout
    xmlns:ohos="http://schemas.huawei.com/res/ohos"
    ohos:height="match_parent"
    ohos:width="match_parent"
    ohos:alignment="center"
    ohos:orientation="vertical"
    ohos:background_element="#EDEDED"
    >
    <Button
        ohos:height="match_content"
        ohos:width="match_content"
        ohos:id="$+id:Changecolor"
        ohos:text="获焦后变色"
        ohos:text_color="white"
        ohos:text_size="31vp"
        ohos:horizontal_center="true"
        ohos:bottom_margin="20vp"
        />
    <Button
        ohos:below="$id:Changecolor"
        ohos:height="match_content"
        ohos:width="match_content"
        ohos:id="$+id:bigger"
        ohos:background_element="$graphic:black"
        ohos:text="获焦后放大"
        ohos:text_color="white"
        ohos:text_size="31vp"
        ohos:horizontal_center="true"
        ohos:top_margin="20vp"
        ohos:bottom_margin="20vp"
        />
    <Button
        ohos:below="$id:bigger"
        ohos:height="match_content"
        ohos:width="match_content"
        ohos:id="$+id:dialog"
        ohos:background_element="$graphic:black"
        ohos:text="获焦后放大"
        ohos:text_color="white"
        ohos:text_size="31vp"
        ohos:horizontal_center="true"
        ohos:top_margin="20vp"
        ohos:bottom_margin="20vp"
        />
    <Button
        ohos:below="$id:dialog"
        ohos:height="match_content"
        ohos:width="match_content"
        ohos:id="$+id:exit"
        ohos:background_element="$graphic:exit"
        ohos:text="退出焦点"
        ohos:text_color="red"
        ohos:text_size="31vp"
        ohos:horizontal_center="true"
        ohos:top_margin="20vp"
        ohos:bottom_margin="20vp"
        />
</DependentLayout>
由于此处的XML布局用的是DependentLayout,所以我们需要为每个Button设置其专属的Id,并为它们设置below,使每个Button组件有序地排在其below的对象的下方。
第二个到第四个Button组件的背景元素由之前创建的graphic文件所定义,而第一个Button组件的背景元素在后文将通过代码布局来创建。
另外,这四个Button组件的组件大小是笔者临时通过XML文件定义的,所以它们目前的大小并不是很得体,不过其最终显示的大小将在MainAbilitySlice中通过代码进行定义。
3、设置Button组件的交互逻辑
原理
  Button button=new Button(this);
  button.setTouchFocusable(true);
 button.setComponentStateChangedListener(new Component.ComponentStateChangedListener() {
            @Override
            public void onComponentStateChanged(Component component, int i) {
                if(ComponentState.isStateMatched(ComponentState.COMPONENT_STATE_FOCUSED,i)){
                   ...
                }else {
                   ...
                }
            }
        });
以上是关于组件焦点的应用的核心代码:
在第一部分中,我们创建了一个新的Button对象,并将其TouchFocusable(即是否可通过触摸使该组件获得焦点)设置为了true,使该组件可以通过触摸获焦。
在第二部分中,我们为此Button组件设置了组件状态改变监听器(即ComponentStateChangedListener),并利用匿名内部类实现监听器接口。最后,在onComponentStateChanged中,我们还需要设置一个if的判断,()内的代码表示判断组件是否处于焦点状态,()后的{ }需要写入组件获得焦点后执行的代码,而else后的{ }需要写入组件失去焦点后执行的代码。
知道这个原理后,我们便开始写下文的代码。
设置一个用于退出焦点的按钮
打开MainAbilitySlice。
首先,设置一个用于使其他组件失去焦点的Button组件,它除了能占据焦点外,没其他什么特别的功能。
 Button button_exit=(Button) findComponentById(ResourceTable.Id_exit);
        button_exit.setTouchFocusable(true);
        button_exit.setComponentSize(720,170);
组件获得焦点后改变颜色
先设置两个ShapeElement,分别命名为element1与element2,它们用于定义Button组件的背景色与圆角。
然后,对这个Button对象写入核心代码(顺便定义Button对象的尺寸),当if中的条件判定成功后(即组件成功获得焦点),改变Button对象的背景元素,使其从蓝色变为橙色;当组件失去焦点后,将Button对象的背景元素恢复成初始值。
 ShapeElement element1=new ShapeElement();
        element1.setRgbColor(new RgbColor(255,125,0));
        element1.setCornerRadius(80);
       ShapeElement element2=new ShapeElement();
        element2.setRgbColor(new RgbColor(0,125,225));
        element2.setCornerRadius(80);
        Button button_changecolor=(Button) findComponentById(ResourceTable.Id_Changecolor);
        button_changecolor.setComponentSize(700,150);
        button_changecolor.setBackground(element2);
        button_changecolor.setTouchFocusable(true);
        button_changecolor.setComponentStateChangedListener(new Component.ComponentStateChangedListener() {
            @Override
            public void onComponentStateChanged(Component component, int i) {
                if(ComponentState.isStateMatched(ComponentState.COMPONENT_STATE_FOCUSED,i)){
                    button_changecolor.setBackground(element1);
                    button_changecolor.setText("颜色已改变");
                }else {
                    button_changecolor.setBackground(element2);
                    button_changecolor.setText("获焦后变色");
                }
            }
        });
组件获得焦点后变大
与上文同样的道理,这次我们让Button组件获得焦点后尺寸变大,失去焦点时恢复原状。
 Button button_bigger=(Button) findComponentById(ResourceTable.Id_bigger);
        button_bigger.setComponentSize(700,150);
        button_bigger.setTouchFocusable(true);
        button_bigger.setComponentStateChangedListener(new Component.ComponentStateChangedListener() {
            @Override
            public void onComponentStateChanged(Component component, int i) {
                if(ComponentState.isStateMatched(ComponentState.COMPONENT_STATE_FOCUSED,i)){
                    button_bigger.setComponentSize(800,200);
                    button_bigger.setText("已放大");
                }else {
                    button_bigger.setComponentSize(700,150);
                    button_bigger.setText("获焦后放大");
                }
            }
        });
组件获得焦点后弹窗
与前面的代码不同,这次设计的Button组件不需要前文提到的核心代码,而是设置个点击监听器即可。
本次我们需要用到PopupDialog组件,这是一种气泡型对话框。在HarmonyOS中,对话框有个机制,即当对话框弹出来时,对话框会始终处于焦点状态并使其他组件无法重新获得焦点,即此时我们无法与除了对话框以外的组件进行交互。所以,在设计此Button组件时,我们无需设置状态改变监听器。
首先,我们通过ID获取一个Button对象,并设置相关参数。
接着,创建一个PupopDialog对象和一个Text对象(他们的context都填MainAbilitySlice.this),设置Text对象的参数,并且设置点击监听器,使得其受到点击后让PopupDialog隐藏;设置PopupDialog的相关参数,并将先前创建的Text对象作为自定义组件加入到PopupDialog中。
最后,设置Button对象的监听器,使得其受到点击后,PopupDialog在页面中弹出。
 Button button_dialog=(Button) findComponentById(ResourceTable.Id_dialog);
        button_dialog.setComponentSize(700,150);
        button_dialog.setTouchFocusable(true);
        button_dialog.setText("获焦后弹窗");
        PopupDialog popupDialog=new PopupDialog(MainAbilitySlice.this,button_dialog);
        Text tip=new Text(MainAbilitySlice.this);
        tip.setText("  这是一个弹窗(点击即可关闭)");
        tip.setTextSize(83);
        tip.setTextColor(Color.WHITE);
        tip.setLayoutConfig(new ComponentContainer.LayoutConfig(ComponentContainer.LayoutConfig.MATCH_CONTENT,ComponentContainer.LayoutConfig.MATCH_CONTENT));
        tip.setClickedListener(new Component.ClickedListener() {
            @Override
            public void onClick(Component component) {
                popupDialog.hide();
            }
        });
        popupDialog.setCustomComponent(tip);
        popupDialog.setHasArrow(true);
        popupDialog.setBackColor(Color.BLUE);
        popupDialog.setMode(LayoutAlignment.CENTER|LayoutAlignment.BOTTOM);
        button_dialog.setClickedListener(new Component.ClickedListener() {
            @Override
            public void onClick(Component component) {
                popupDialog.show();
            }
        });
这样之后,第三个Button组件就做好了。点击这个Button组件后,PopupDialog弹出,再点击PopupDialog后,PopupDialog隐藏。
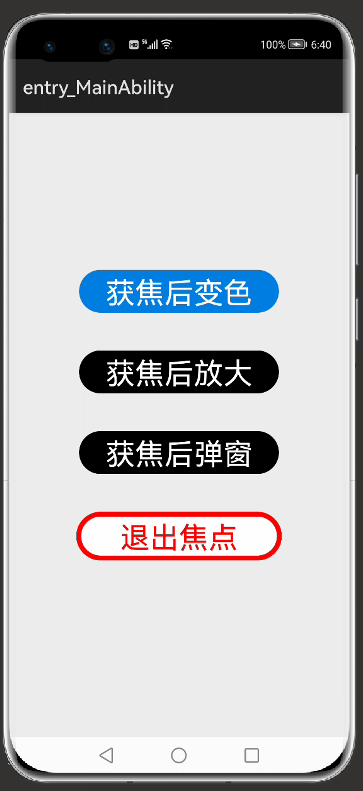
打开模拟机,我们便可以查看效果:

结尾
本期的分享到这里就结束了,我们在下一期分享见!
 蜀ICP备20004578号